The Beeman Garden Tractor.
This page is
Copyright 1999 by Mark Bookout. You may not reproduce this text, or the
images linked to from this page, on your web site, or print and sell, or
distribute, the text or the images, though you may print it for personal use at
any time, and you may link to this page from your web site if you notify me in
writing that you wish to do so.
Introduction.
The
Beeman tractor is a 4 horsepower single speed walking tractor which utilizes a
built in, L head, water cooled, gasoline engine with a 3 1/2 inch bore and 4
1/2 inch stroke. It was the first
commercially successful walking tractor, as well as the first that was produced
in significant numbers.
First
sold in 1917, this tractor was used in field tests as early as 1915.
The
Beeman configuration consists of a lower block, and upper block containing the
cylinder, separate crankshaft bearing housings which also double as the
journals for the wheels, external flywheels which, because the crankshaft exits
the engine through the wheel journals, appear to rotate inside the wheels A set of steering and control handles, and
trailing implements, such as plow, cultivator, and mower complete the machine.
The
tractor was also billed as a portable power unit, using a flat belt pulley
mounted on the right hand engine flywheel to drive detached implements, such as
grinders, saws, and mills.
Following
is a transcription of the text of the operators manual for an early Beeman
tractor. I have taken the liberty of
clarifying some of the grammar, as well as adding restoration comments (in
italics) where I felt clarification would be useful to the modern day owner of
one of these machines.
Setting Up Directions
covering
Beeman Multi-Service Tractor
The tractor is shipped without water in the
radiator, gas in the tank, or oil in the crank case. Fully supply before running.
Any instructions on tags or sacks are for your benefit; see that they
are read and understood before destroying.
R.H and L.H. refers to right hand and left
hand as you stand in the rear of the tractor, facing same.
First - Uncrate
tractor. Place a support under radiator
to hold tractor in position while setting
up.
Uncrate handles.
Second - Place
handles in position by inserting lower ends into handle bar hinge socket B616
seeing that pipe handles pass through the two collars B517, their position
being in the recess on each side of B616 and their purpose is to hold the
handles in position and still allow them to oscillate. It is important that pipe handles enter B616
to the bottom, otherwise your control rods will appear too long.
Tighten set screws in collars B517.
Level up hand grips and hold in place by
tightening set screws in B616.
The handles should be allowed to oscillate
if the equipment being used is attached to the handle bars. The shift castings B666 are on the pipe
handles are for that purpose, they may always remain in position whether used
or not. If the equipment is not attached
to the pipe handles, then the handles should be made stationary by setting up
the set screws in B616.
Third - Connect up
clutch rod in L.H. handle with its continuation attached to clutch yoke
B132. The clutch should now work
properly as it was adjusted at the factory.
It is well to test it out and make sure as the adjustment may have been
disturbed in shipping. To do so unlatch
the clutch handle and let the clutch in; examine the lower end of the rod where
it is attached to the clutch yoke; it should
be free, just a little loose. It should
not be tight, as that would indicate the clutch was riding on the adjusting
rods and was not fully in mesh. To
correct this condition: loosen the nut
and jamb nut on the lower end of the clutch rod a trifle or sufficient to
remove the strain from the clutch rod.
When the clutch is pulled out, by latching he lever B162, on the handle,
the flywheels should turn freely; if they do not, the rod must be shortened by
taking up the nut and jamb nut at the lower end of the clutch rod a trifle.
Fourth - Connect up
the gas control rod in the R.H. handle.
The short connecting link is to enter the gas control arm and is held by
a cotter pin.
Fifth - If the
tractor is to be used for belt work, place the 9" castor wheels in place
on the draw bar swivel B618 and place the belt pulley in position on the hub of
the R.H. fly wheel.
For other types of work, equipment is to be
attached as per the instruction book covering the implements.
For export the bull wheels are removed to
economize in space. The following will
then apply and will also be of use to parties who have occasion to take their
tractor apart.
TO
PROPERLY PLACE BULL WHEELS
Remove fly wheels. If from an old machine, see cut No. 4,
remove the hold on washers, felt retainers, felt washers, and dust caps. Place bull wheels in position and hold with
the hold on washers, tighten screws well and then prick punch them to prevent
their moving; then put on the retainer washers, felt washers and dust
caps. Now place the split sleeves in
position on the crank shaft leaving 1/4" of space between the inner end of
the sleeve and the dust cap; this space
is required for convenience later on when you may find it necessary to remove
the bull wheels. The fly wheels set on the taper sleeves, the one with the
crank No. B27 goes on the L.H. side.
Tighten to place with the special wrench B674, this will give additional
leverage necessary to force the flywheels up securely on the taper sleeve.
STEERING
HANDLES (For Export)
Enter pipe handles in socket B616, pass
them through collars B517 in the recess on each side of B616. See that handles reach the bottom of
B6116. Insert the 1/4: clutch rod into
the L.H. handle, end with the short bend down.
The 3/16" rod goes into the R.H. handle, the lower end has a short
joint attached.
Place cast handles in position on the pipe
handles. B165 on the R.H. handle and
B164 on the L.H. handle. Before
entering handles on the pipes, place the tie rod in the sockets of both
handles, loops down. The tie rod is
5/16" round, 8" long with 1
1/8" loops at each end. Slip all
into place on the handle bar end simultaneously so the pipes just come through
flush in steering handles. See cut No.
1.
Clutch Control rod.
Loosen the set screws on the clutch
shifting handle B162, then pulling out B530, the clutch release rod (1/2: x 10
1/4:), then passing the bent end of the clutch rod through the hole in the
clutch release rod B530, then replace the cotter pin. Take up whatever slack there may be in the clutch rod by
tightening nuts on the clutch yoke B132, leaving a very little slack when the
clutch yoke is engaged. One of these
nuts acts as a jamb nut. Tighten the
steering handles to place with their set screws; first seeing that the handles
are level. Then tighten the set screws
on the clutch shifting handle B162 to B530 so the clutch release rod is brought
back as far as possible, giving B530 a full throw to release the clutch in the
tractor. When shifting handle B162 is
latched, see cut No. 1 (( Huh? ))
Gas Control Rod.
The Gas Control Rod is adjusted the same as
the Clutch rod and is set properly when it fully opens and fully closes the
butterfly valve on the carburetor.
B94, the gas control lever, is attached by set screw to it's connection
and can be adjusted to any desired position to suit the operator.
To Attach Muffler Pipe.
If you have a socket wrench, it will not be
necessary to remove the side shield.
Remove the L.H. side shield, then se that
the exhaust port is not plugged. Fasten
the muffler stem, B109, at the flange where two cap screws and washers are in
place. Tighten each cap screw a little
at a time so as not to break the lugs on the muffler pipe. Screw the Muffler head to the top of the
muffler stem;, then replace the side shield
OILING
Use a good grade of medium weight oil, such
as you would use in your Automobile.
GREASE
File the grease gun with Hard Oil No.
3. There are 5 grease fittings as
follows: one for the Fan, one for the
Miter Gear Housing, one for the Magneto Shaft Bearing and one for each bull
wheel.
Use the grease gun frequently enough to
prevent wear. Special attention must be
given to the bull wheels for the first few days. See that they are greased every two hours until the wheels are
broken in.
Magneto.
Use a "three in one" or similar
oil, about two drops of oil once a month will answer.
Crank Case.
Oil is added to the crankcase through the
Breather Pipe. First remove the
breather valve or cap at the top. Open
the pet cock on the head end of the crank case. See that the tractor sets
level, and pour in the oil in the breather pipe until it runs out of the open
pet cock. It requires about 1 1/4
quarts of oil to fill the crank case.
Examine the case every 5 our so hours of work to see if there is
sufficient oil.
Suggestion.
After each day's work of ten hours, drain
the crank case over night. In the
morning, strain the oil through an 80 mesh cloth or wire strainer, add enough
fresh oil and place it back in the crank case.
Crank Engine by Means of Handle on L.H. Fly
Wheel.
First see that the clutch control on the
L.H. handle is latched. (Set the
throttle about 1/4 open and choke the tractor for one or two turns of the flywheel. Spin the flywheel briskly because the
magneto does not have an impulse, so it will not spark at low speeds.) After the engine has started, place the
crank handle back in it's housing.
This is done with the engine running slowly and allowing the handle to
strike the heel of your boot.
If the engine does not start readily, use
the choke sufficiently to secure results.
TO
START TRACTOR
Throw in the clutch by releasing the L.H.
lever and the machine will move forward.
The speed is regulated by the gas control lever. (The throttle lever,
or gas control lever, should be operable with your thumb and forefinger, but
should not be so free as to flop. Since
there is no governor on this engine, the operator will perform that function.)
CLUTCH
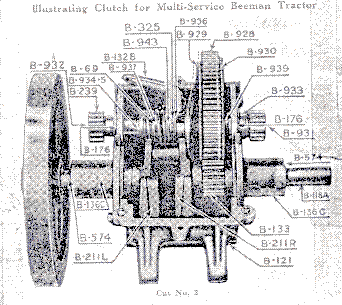
Examining Cut No. 3 with the following explanation
will give you an idea of how the clutch works.
The large gear B928 with the two side plates B929 and B930 are the
working parts. Gear B928 is always in
mesh with the gear B133 on the crank shaft .
To remove the power, plates B929 and B930 must be separated from gear
B928. This is done by means of the
clutch handle. You let the handle in to
apply power, you pull it out to remove the power. The action in stopping the machine is as follows. The operator pulls the clutch handle toward
him for the purpose of latching it; as
he does so, the part B930 remains in it’s position, gear B928 and plate B929 move
over to the L.H. side until the teeth on the gear B928 strike the shoulder on
the crank shaft. This prevents it from
going further. Plate B929 continues to
move to the left thus entirely separating the three units. To apply the power, the operation is
reversed.
TO
ADJUST CLUTCH
If the tractor creeps forward when the
clutch lever is latched, or if either Bull Wheel fails to pull, it will
generally be found that the clutch control is out of adjustment. To remedy, check up the following points and
study illustrations 1,2, and 3. The
effective adjustment gives the clutch yoke all the range of action possible.
Suggestions. Set the casting handle B164 (see Cut No. 1) so that the pipe
handle lacks coming through the opening in B164 by about 1/8”. Set the clutch lever, B162, on rod B530 (by
means of set screws) so the a full range of action is had in operating the
right (L shaped) end of the rod B530.
When the clutch is let in, the L end of B530 should be pulled well
forward but the rod should never, when the clutch is engaged, be pulling on
B530. When the clutch is pulled out,
B530 should swing well to the back of B164.
CONNECTING
ROD
The connecting rod is a Drop Forging with
detachable bronze back, Babbitt lined bearings. To tighten the bearing, remove a sufficient number of leaves from
the shims. A plate on the bottom of the
crank case can be removed allowing you to get at the bearings for
adjusting. In removing the leaves of
shims, take one off on each side or two as necessary, and equal number should
be taken from both sides. The cap on
the connecting rod must be removed in order to do this. In replacing same, see that the punch marks
correspond and that the bots are made tight and that the cotters are put in
back of the bolts thus preventing the bolts from backing up. You may get the bearings too tight. After the bearings are in, run the motor
slowly for about two hours, keeping it well supplied with water and oil and
watch it closely.
WRIST
PIN BEARINGS
Should they become worn (evidenced by a
metallic click in the cylinder) the situation can only be remedied by a new
piston and wrist pin.
CRANK
SHAFT BEARINGS
The crankshaft runs on Timken Roller
Bearings and will need adjustment in time.
The need for adjustment is indicated by end play in the crankshaft. In assembling, a number of shims between the
bearing housing and the lower block are used for the purpose of adjusting the
fit of the bearings. To adjust the
roller bearings, it will be necessary to take off the bull wheel, fly wheel and
bull wheel bearing on one side, then remove one or more shims which are located
between the bull wheel bearing and the block.
Only remove enough to take up the play, do not make it too tight. (The
roller bearings reside in the casting that also serves as the wheel bearing. )
TO
REMOVE FLY WHEELS AND BULL WHEELS
Use wrench B674 by adding a handle of 1”
pipe, 24” long and remove the large nut B53.
This exposes the end of the split sleeve B54 on which the fly wheel
rests. This sleeve is tapered and the
nut has forced the flywheel well up on the taper, but a sudden blow on the
taper sleeve will set it back and loosen the fly wheel. B640 pipe is furnished for this use. Place one end against the sleeve B54 and hit
it a sharp blow with a hammer. This
releases the fly wheel. You can now
remove the sleeve B54, the dust cap B87, the felt washer B146, the retainer washer
B88. The end, or hold on, washers are
next removed by taking out the three screws in each one which leaves the bull
wheels free to come off.
In reassembling simply reverse the
operation, see that the hold on washers B26 are fastened securely and that the
screws are prick punched to hold them.
Also see that the split taper sleeves on which the flywheels set have a
space back of them of ¼” for future
convenience in removing the flywheels.
(If the tapered sleeves are pushed clear
back against the crank bearing housing, you will not be able to loosen the
flywheels with the method described above, since there will be no room for the
tapered sleeve to slide. Be sure you
leave the ¼” gap between the back side of the taper sleeve and the crank
bearing housing.)
Before tightening the nuts of split sleeve,
B54, see that the arrow on the end of the crank shaft points up. Then turn the L.H flywheel so the end of the
crank handle is opposite the tail of the arrow on the crank shaft. Now tighten the nut on the split sleeve and
see that it is good and tight.
VALVES
How
the Motor is Timed
The Motor of the Beeman Tractor is timed as
per the charts shown:
Figure
No. 1 on this chart represents Head Dead Center (Top Dead Center)
Figure
No. 2 on this chart represents Crank Dead Center (Bottom Dead Center)
Figure
No. 3 on this chart represents when the exhaust should start to open. (20
degrees before BDC)
Figure
No. 4 on this chart represents when the exhaust should close.(5 degrees
after TDC)
Figure
No. 5 on this chart represents hen the inlet valve should start to open.(24
degrees after TDC)
Figure
No. 6 on this chart represents when the inlet valve should close.(30 degrees
after BDC)
Figure
No. 7 on this chart represents when ignition or spark from the magneto should
take place. (32 degrees before TDC)
There are no timing marks on this motor.
Should it be necessary to time the valves,
do so by first consulting this chart and time the exhaust valve as shown in
Figure No. 4, which shows that this valve should close at Head Dead Center
(which is shown in Figure No. 1) or not to exceed 5 degrees over this center.
Before starting to time the motor we would
recommend that you take a piece of spring wire or if this is not available get
a bow from an old umbrella and bend it in the shape of a horseshoe so that the
ends are somewhat wider than the distance between the valve tappet stems. Then place this bent wire between the valve
tappet stems so as to secure to place the valve tappets in order to prevent
them from dropping down when you are placing your camshaft in proper
position. When timing the motor be sure
that your crankshaft rotates in the manner the arrow indicated on this chart. By timing your exhaust valve in this manner,
all other operations of valve mechanisms are taken care of automatically with
the exception of the magneto timing.
If you have your cylinder head off when you
time the magneto after you have your valves timed by rotating the crankshaft
around, in the direction the arrow indicates, say two or three times, we would
suggest that you measure the distance between the top of your piston and the
face of the cylinder when your piston is on Head Dead Center, then when both
valves are closed and the piston is traveling up on the compression stroke,
stop when within 7/16” of an inch of the complete stroke, or the Head Dead
Center. Open the end of the interrupter
housing on the magneto. Loosen the set
screw win the coupling on the magneto shaft and turn the coupling in it’s right
direction, which is counter clockwise, which means the reverse motion to the
hands of the clock, and see that the breaker points are set so that they just
begin to break when the piston is in this position. Fasten the set screw securely in the magneto coupling and
assemble all the parts on your machine;
it is now ready to run.
Dirty Valves.
The valves seldom get out of order - but
they do get dirty, as a result of carbon collecting on the valve seats. Carbon deposit prevents proper closing of
the valves, permits the gasses under compression to escape, resulting in the
loss of power and uneven running of the motor.
If, when turning the engine over slowly, there is only a slight
compression in the cylinder, it is probable that the valves need
regrinding. As the power of the engine
depends largely upon the proper seating of the valves, it is necessary that
they be ground occasionally.
How To Take Out Valves.
1. Drain and remove the radiator.
2. Remove the gasoline tank
3. Remove the cylinder head.
4. Remove the fan
5. Remove the valve cover on the front of the
engine.
6. Raise the valve spring and pull out the
little slotted washer under the large washer, which olds the spring. The valve may then be pushed up and lifted
out.
How to Grind or Clean Valves
For this work use a good grinding paste,
procurable from an auto supply house.
If it is too thick, add a little kerosene or oil to make a thin
paste. Place the mixture sparingly on
the bevel face of the valve. Use a
light spring, one that will raise the valve off the seat yet can be compressed
between the valve head and the valve guide.
Put the valve in position on the valve seat and rotate it back and forth
(about a quarter turn) a few times, with a grinding tool or screw driver. Then lift slightly from the seat, change the
position and continue the rotation, and keep on repeating this operation until
the bearing surface is smooth and bright.
The valve should not be turned through a complete rotation as this is
apt to cause scratches running around the entire circumference of the valve and
seat. When the grinding is complete the
valve should be removed from the cylinder, thoroughly washed with kerosene and
the valve seat wiped out thoroughly.
Extreme care should be taken that no gritty substance gets into the
cylinders or valve guides. This can be
avoided if the grinding paste is applied sparingly to the bevel face of the
valves.
When the valves or tappets become worn.
When the valves or tappets become worn so
as to leave too much play between them, thus reducing the lift of the valves
and diminishing the power of the motor, it is best to replace the tappets with
new ones. The clearance between the
tappets and the valve stem should never be greater than .008” nor less than
.004”. If the clearance is greater, the
valve will open late and close early, resulting in uneven running of the
motor. If the clearance is less than
.004” there is danger of the valve remaining partially open all the time. If, by replacing the push rod, the clearance
is more than .008” the valve should be replaced with a new one. If there is not enough clearance then the
tappets should be fitted down until you get the proper clearance of .004”. We do not recommend drawing out the valve
stem, as the operation requires experience and the price of the new parts does
not warren the time and expense necessary to properly do the work.
Valve Springs.
When the valves fail to seat themselves
properly there is a possibility that the springs may be weak or broken. A weak inlet spring would probably not
affect the running of the engine, but weakness in the exhaust valve spring
causes a very uneven action, which is difficult to locate. The symptoms are a lag in the engine due to
the exhaust valve closing too late and the valve not held down to its seat
properly and as a result a certain percentage of the charge under compression
escapes, greatly diminishing the force of the explosion. Weakness in a valve spring can usually be
detected by the following method:
Remove the plate which enclosed them at the front of the cylinder and
insert a screw driver between the coils of the spring while the engine is
running. If the extra tension thus
produced causes the engine to pick up speed, the spring is obviously weak and
should be replaced with a new one.
CARBURETORS
Carburetors on all our tractors are
adjusted at the factory before being shipped, but in case the adjustment has
been changed during transportation, turn the needle valve to the right until
the needle valve will not turn further.
Do not screw the needle down too tight as it will spoil the true taper
on the needle valve, or damage the valve seat.
Then turn to the left ¾ of a turn.
This should open it enough for starting. After the engine warms up adjust the carburetor by turning the
valve to the right or left, whichever may be necessary to make the engine run
the smoothest. Turning to the right
decreases the flow of gas and makes the mixture leaner - turning to the left
increases the flow and make a richer mixture.
A lot of trouble may be saved if gasoline is strained before putting it
into the gasoline tank, and the carburetor bowl should be drained after the
engine has been standing for any length of time. This will take off any water or dirt that may have accumulated in
the carburetor.
A lean mixture has too much air and not
enough gasoline. A rich mixture has too
much gasoline and not enough air. A
rich mixture will not only quickly cover the cylinder, piston, and valves with
carbon, but it will also ten d to overheat the cylinder and is likewise
wasteful of fuel. It will often choke
the engine and cause misfiring at high speeds although at low speeds the
machine will run perfectly. The mixture
should be kept as lean as possible with out the sacrifice of any of the power
of the motor. A lean mixture will often
result in back firing through the carburetor, for the reason that the gas burns
slowly in the cylinder, and is still burning when the inlet valve opens again,
which causes the gas I the intake to ignite.
A right mixture is shown by heavy, black exhaust smoke with a disagreeable smell. Proper mixture will cause very little smoke
or odor and gives the maximum power to be had.
Water in the Carburetor.
The presence of water in the carburetor,
even in small amounts, will prevent easy starting and the motor will misfire
and stop. As water is heavier than
gasoline it settles at the bottom of the carburetor along with other foreign
matter. As it is difficult, nowadays,
to get gasoline absolutely free from impurities, it is advisable to frequently
drain the carburetor by opening the petcock at the bottom of the
carburetor. During cold weather, water
is liable to form in the carburetor by reason of condensation and unless
drained off will freeze. It is
advisable to shut off the gasoline by the stop cock under the gas tank and let
the motor run until it dies, then open the drain cock on the carburetor and
allow the condensed water to escape.
Unless you do this, damage to the carburetor may result and you will
experience difficulty in staring the motor.
What Makes the Carburetor Leak?
The flow of gasoline entering the
carburetor though the feed pipe is automatically regulated by the float needle
raising and lowering in its seat.
Should any particle of dirt become lodged in the seat, which prevents
the needle from closing, the gasoline will overflow in the bowl of the
carburetor and leak out upon the ground.
To remedy: shut off the gasoline
cock, disconnect the gasoline pipe at the carburetor. Take off the carburetor bowl by removing the nut at the bottom of
the carburetor bowl, then remove any dirt underneath the float seat. Replace the parts you have removed.
When there is Dirt in the Carburetor.
The spraying nozzle of the carburetor
having a very small opening, a minute particle of grit or other foreign matter
will clog up the opening and as a result the motor will begin to misfire and
slow down as soon as it has attained ay considerable speed. This is accounted for by the fact that the
high speeds the increased suction will draw the particles of dust, etc, into
the nozzle. By opening the valve needle
half a turn and giving the throttle lever two or three quick pulls, the dirt or
sediment will often be drawn through,
when the needle may be turned back to its original place. If this does not accomplish the purpose, the
carburetor should be drained.
If the Engine Runs Too Fast with the
Throttle Fully Retarded.
If the engine runs too fast when the
throttle is fully retarded, unscrew the carburetor throttle lever adjusting
screw until the engine idles at a suitable speed. If the motor stops when the throttle is fully retarded, the
throttle lever adjusting screw should be screwed in until the engine will not
stop when the throttle lever is fully retarded.
Flooded Carburetor.
If you have any difficulty in starting your
engine after following these instructions, it may be that you have flooded the
engine with gasoline by excessive cranking.
This can be remedied by opening the priming cup and turning the engine
over (my means of using the starting handle on the fly wheel) fifteen or twenty
revolutions, being sure first that the gasoline throttle to the carburetor is
closed. This will cause the surplus
gasoline to escape.
AIR
CLEANER
Attached to each machine is an Air Cleaner. This connects with the carburetor on the air
intake which means that the new air taken into the carburetor must first pass
through the air cleaner in which all dust, or other elements in the air, are
collected and are not permitted to pass into the carburetor, and through o the
cylinder where the dirt and sand would score the cylinder walls and wear all
bearings on the interior of the engine.
CARE
OF THE AIR CLEANER
Follow directions attached to the air
cleaner.
Directions say to clean the unit in the
evening. This give s the oil a chance
to soak in the surplus to drain away, or otherwise excessive oil will be drawn
into the cylinder and foul the spark plug.
Give the cleaner the proper care as this is very important.
MAGNETO
The magnetos on our machines are properly
adjusted at our factory before the tractor is shipped out. It may happen that while in transit or being
used for some time they get out of adjustment.
In this case see the special magneto direction book, with each tractor,
but do not take the magneto apart.
Either write to us, the magneto factory, or consult a good automobile or
tractor mechanic.
Have You a Spark?
If your engine does not start, find out if
you have any spark to ignite your gasoline charge. This can be done by taking the spark plug out of the cylinder
head (leaving the high tension wire attached), and crank the motor. Hold the spark plug to any part of the
cylinder and if sparks appear between the spark plug points, you have
sufficient spark for both starting and running your tractor.
What should be done if the Engine
Overheats?
If your engine overheats, check these
things:
1. Fill the radiator until it is full.
2. See that the fan belt is tight.
3. See that you have sufficient oil in the
crank case.
Remember that the engine develops the
greatest efficiency when the water is heated nearly to the boiling point. But if there is persistent overheating when
the motor is working under ordinary conditions - find the cause of the trouble
and remedy it. The chances are that the
difficulty lies in a carbonized cylinder.
If the engine has been run without water in the radiator and is very
hot, do not put water in the radiator until the engine cools off.
ENGINE
KNOCKING
How may the different knocks be distinguished?
Different causes of knocks have different
types of sounds. Following is a list of
things to listen for if your engine knocks.
1. The carbon knock is a clear, hollow sound,
most noticeable in hard pulling, particularly when the engine is heated. It is also indicated by a sharp rap
immediately on advancing the throttle.
2. The connecting rod knock sounds like the
distant tapping on steel with a small hammer, and is readily distinguished when
the motor is allowed to run idly or upon speeding the motor, then suddenly
closing the throttle, the tapping will be very distinct.
3. The crank shaft main bearing knock can be
distinguished when the pulling is hard, as a dull thud.
4. The loose piston knock is heard only upon
suddenly opening the throttle when the sound produced might be likened to a
rattle.
5. The wrist pin knock is noticeable when the
motor has been accelerated and suddenly closed. A metallic click will be evidenced.
6. Pre-ignition knock; caused by an early explosion in the cylinder
which may be caused by an overheated motor, carbonized motor, or irregularities
in the cylinder wall of the water jacket, which become overheated and ignite
the gasoline charge before the spark has been fired.
How is carbon removed from the Combustion
Chamber?
One of the quickest and easiest ways of
removing carbon from a cylinder is to take the tractor to your local garage
where the carbon can be burned out at a nominal charge.
However, if you have the time and prefer
doing it a home, it can be done this
way:
1. Drain the water off by opening the petcock
oat the bottom of the radiator.
2. Then disconnect the wires at the top of the
motor and also the radiator connection attached to the radiator.
3. Take off the gasoline tank.
4. Turn the crank flywheel so that the arrow
head on the end of the crank shaft points up on the compression stroke, which
means that the piston is at the top of the cylinder.
5. Remove the 9 cap screws which hold the
cylinder head in place
6. Take off the cylinder head and with a putty
knife or screw driver, scrape from the cylinder and piston heads the carbonized
matter, being careful to prevent the specks of carbon from getting into the
valves or bolt holes.
7. Replace the cylinder head gasket, then put
the cylinder head in place
8. Be sure and draw the cylinder head bolts
down evenly (i.e., give each bolt a few turns at a time). Do not tighten them up on one end before
drawing them up at the other. Be sure
that they are all drawn tight.
Water in the Cylinder.
If there is water in the cylinder it is a
sign that either the cap screws on the cylinder head are not screwed down tight
enough or the gasket, between the cylinder
and cylinder head , is broken and admits the water to leak from the
water chamber to the cylinder.
If tightening of the cap screws in the
cylinder head does not remedy the trouble it is evident that the gasket in the
cylinder head is broken and should be replaced by a new one.
To put in a new gasket it will be necessary
to remove the cylinder head; See
instructions in paragraph 111. (What paragraph is this? Perhaps in a maintenance manual of some
sort)
IMPORTANT
How Often Should Oil be Cleaned out of the
Crankcase?
After each day’s work of ten hours, place
an oil receptacle underneath each oil plug at the bottom of the crank case and
take out the plugs. Let the oil drain
over night. In the morning put the oil
plugs back in place; strain the oil thus drawn off through either a wire or
cloth strainer, with at least a number eighty mesh, and add thereto a
sufficient supply of fresh oil to top off the crank case supply.
Necessity for frequent draining of the oil
is occasioned by reason of the fact that while the patented air cleaner which
we purchase for and supply with these machines, catches better than 95% of all
the dust that would ordinarily pass through the carburetor, and very little
dust gets through the breather - nevertheless, the small percentage that does
get in mixes with the lubricating oil and makes it muddy and forms a wearing compound.
The frequent draining and straining of the
oil and cleaning of the transmission case as above suggested, will prolong the
life of the wearing parts indefinitely.
What Attention does the Tractor Need?
Remember that a new machine requires more careful attention during the first
few days it is being used than after the parts have been thoroughly “worked
in”. The Tractor which is driven slowly
and carefully when new usually gives the most satisfactory service in the
end. Never start out wit your tractor
until you are sure that it has plenty of oil and water. Make a practice of taking care of every
repair or adjustment as soon as its need is discovered. This attention requires but little time and
may avoid delays. Each tractor is
carefully inspected, tested and tried before leaving the factory. Afterwards it is the duty of the owner to
keep it in proper condition, which may be done with very little attention if
the attention is given in time.
What should be done when the Tractor is
stored away?
Drain the water from the radiator and then
put in about a quart of denatured alcohol to prevent freezing of any water that
may possibly remain. Drain the dirty
oil from the crankcase after drawing off all the gasoline and cleanse the
engine with kerosene.
Now
that you are a possessor of a Beeman Tractor, don’t leave it out in the
weather, exposed to all elements. Give
your “Beeman” the care and protection it deserves, and a portion of that time
which you would ordinarily give to your horse, whose place the Beeman has
taken. The tractor is the most valuable
machine you have on your farm: it
reduces the man power , horse power, time and labor, now so necessary in
producing food. By using tit
intelligently, it will greatly aid you in producing this year’s crop, and
thereby MAKE YOU MORE MONEY.
The
Tractor is a machine entitled to great care and consideration.